
My Work Environment
Note: As a brief disclaimer, I no longer use this particular setup. I’ve migrated to Docker for pretty much everything. I am leaving this here for anyone that may find it useful.
I have a rather unusual development setup, including multiple devices. Additionally, I hate spending time configuring the same things across each device, as I inevitably miss something. Especially for things like keyboard shortcuts, it is important to me to have consistency so that I don’t have to remember which keys to press based on which computer I use. To that end, I have made extensive use of Chocolatey and VS Code’s new syncing functionality to keep my environment consistent.
I have four computers that I develop on. Two are Windows computers for personal use. I also have two at work. One is Windows and one is Ubuntu. This guide targets the personal computers, as I have control over what I install on them. I do however sync some keyboard shortcuts and other things to my other computers. But especially for the Ubuntu computer, any in depth instructions are excluded here.
Most of my development is in C++, although I occasionally dabble in Python if one of my classes requires it. Most of my development is also for command line applications, but I occasionally feel the urge to make a nice GUI. Consequently, I use VS Code for most of my work with Qt occasionally used for GUIs. While VS Code is certainly incredibly feature rich, it is not a full-fledged IDE. So I also need some build tools to compile everything. And of course, there are the usual tools for version control, containers, and documentation. The full list is as follows:
- Chocolatey (To manage all these applications)
- ClangFormat (For linting, part of VS Code)
- CMake
- Doxygen (For documentation generation)
- Git
- MinGW (64 bit specifically)
- MSVC build tools (A recent addition, since some of my projects require it)
- Python
- Qt Creator
- VS Code
The Short Version
To skip all the context for why these steps are done, just follow this list.
- Install Chocolatey
- Use Chocolatey to install each other component, except Qt Creator. Use the config file displayed below.
- Make sure all necessary locations are on your PATH, as shown in the chart below.
- Pip install pipenv.
- (Sometimes) Add user to docker-users group with
Add-LocalGroupMember -Group "docker-users" -Member "<username>" - Create .gitconfig and .gitignore files at your home directory.
- Install VS Code extensions and tweak settings and keyboard shortcuts.
- Ensure VS Code can see CMake executable and compilers by making test program with
CMake: Configure - If that doesn’t work, set the path to CMake in settings and use
[Scan for Kits]. - Turn on VS Code setting sync.
- Create a .clang-format file at your home directory.
- Install Qt Creator. Make sure to select the right versions to match the compiler.
- Verify that all the compilers, CMake, and associated kits are correct. Manually add any that aren’t.
- Set up ClangFormat through the Beautifier plugin. Point it to the clang-format executable that comes with VS Code.
- Configure any other settings like keyboard shortcuts.
- Test that Qt Creator can make a simple project with the desired compilers.
Setup Steps
First, all of the tools need to be installed. Fortunately, this is easy using Chocolatey. To install it, just follow the instructions located on their site. It can then be used to manage the installation of the rest of tools. To that end, I use a specific configuration file in Chocolatey’s specified format. It also includes some installation flags for specific configurations. It is set up as follows:
<?xml version="1.0" encoding="utf-8"?>
<packages>
	<package id="git"/>
	<package id="python"/>
	<package id="vscode" packageParameters="/NoDesktopIcon"/>
	<package id="mingw"/>
	<package id="cmake" installArguments="ADD_CMAKE_TO_PATH=System"/>
	<package id="doxygen.install"/>
	<package id="docker-desktop"/>
	<package id="visualstudio2019buildtools" packageParameters="--includeRecommended --add Microsoft.VisualStudio.Workload.VCTools"/>
</packages>
To run it, I just type choco install packages.config in an administrator level Powershell window and replace packages.config with the
name of the file. This sometimes takes a little bit to run, but after it is done, I have almost everything installed. The only exception is
Qt Creator. Installation instructions are found below.
I also keep the above mentioned config file and several other configuration files saved in an online drive for easy access from any new computer.
After installation, there are only a few additional configurations that are needed. Primarily, this involves putting several locations on the PATH environment variable. Without this, VS Code, Qt Creator, and some of the other applications can’t find some of the tools. Specifically, the following items should be added. I list where they are installed by default when I run the command, but there may be some differences on each computer. Also, some of these may exist already if the installer added them.
| Location | Purpose |
|---|---|
| C:\Program Files\doxygen\bin | Location of Doxygen’s executable |
| C:\ProgramData\chocolatey\lib\mingw\tools\install\mingw64\bin | Location of the MinGW compiler |
| C:\Program Files\Git\cmd | Location of Git |
| C:\Python39\Scripts\ | Python location, will change depending on version |
| C:\Python39\ | Python location, will change depending on version |
| C:\Users\user\AppData\Roaming\Python\Python39\Scripts | Additional Python location, will change depending on version |
| C:\Program Files\CMake\bin | CMake location |
On the off chance that I use Python for a project, I like to keep separate workspaces with their own packages. For this, I use Pipenv. The default install of Python already comes with pip, so it is just a simple matter of running:
python.exe -m pip install --user pipenv
Lastly, I need to configure one of my computers to allow the use of Docker. I work on a standard account and only use an administrator account for installation of things. So by default, Docker won’t work. My computer running Windows 10 Pro works fine, but not Windows 10 Home. Instead, I just add my standard account to the docker group. That is just a simple matter of running the following in PowerShell:
Add-LocalGroupMember -Group "docker-users" -Member "<username>"
That is the last of the installations. All the tools are installed, so I can now move on to configuration.
Git Configuration
Ths is an easy one. Git stores all its configuration in a .gitconfig file. I keep one in the same spot as the Chocolatey config. I also keep a .gitignore that contains the entries for all the items that I commonly use - C++, Python, Qt, ROS, etc. I just copy these in to the top level directory of each system, usually at the same level as Documents, Downloads, etc. Git will find it in this spot.
VS Code
VS Code is a bit more to set up the very first time, because of the vast number of extensions and settings. However, once finished, it is painless to migrate to a new system. For initial configuration, I downloaded every extension that I use. I then went through and established all the keyboard shortcuts and settings for each. Depending on how complete you want to be, this can take a bit to go through everything. Fortunately, this doesn’t have to be done at once. The sync functionality will keep things updated.
After completing this, I turned on the new syncing feature. This feature was released in 2020 and syncs extensions, keyboard shortcuts, and settings across any synced instance. It uses your GitHub account (and possibly some other options) to store the information. To enable it, follow the instructions at the link above. Once synced, any change you make will propagate across all of your signed in copies. If you set up a new machine and turn on sync it will download everything. It also warns you if there are conflicts and asks you to resolve them before continuing.
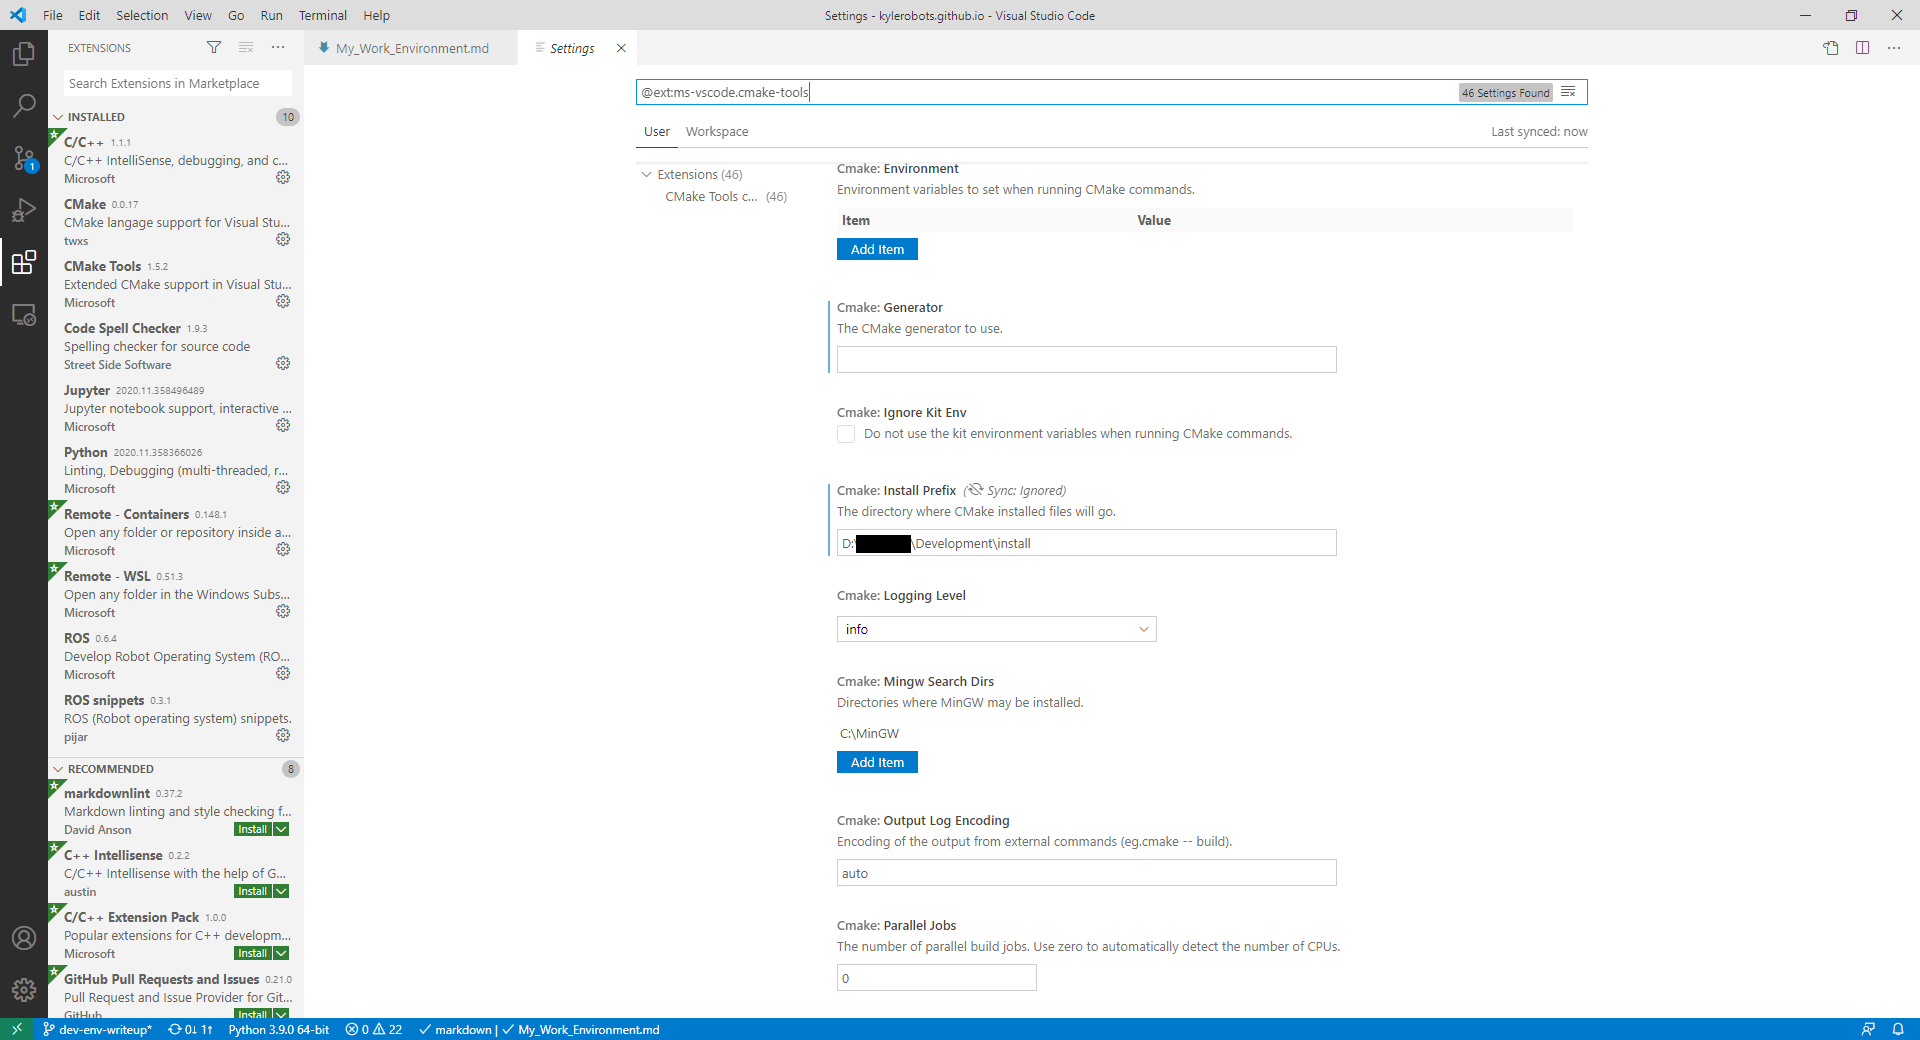
Additionally, it also has the ability to ignore certain settings. This comes in particularly useful for computer specific information. For example, I use a different location to build projects on each computer (due to hard drive size differences). So this setting is disabled, as shown in the screenshot below.
If all the various build tools are on your PATH, then there typically aren’t any additional settings that need changed in VS Code. If not, you might need to tell it where to find CMake and MinGW.
Additionally, I ran the CMake: Scan for Kits command for the CMake extension. This searches your path for all available compile systems. This is necessary to
allow it to find both MinGW and MSVC. After successfully running, the cmake-tools-kits.json file, found by running CMake: Edit User-Local CMake Kits should
look something like this:
[
  {
    "name": "GCC 8.1.0",
    "compilers": {
      "C": "C:\\ProgramData\\chocolatey\\lib\\mingw\\tools\\install\\mingw64\\bin\\gcc.exe",
      "CXX": "C:\\ProgramData\\chocolatey\\lib\\mingw\\tools\\install\\mingw64\\bin\\g++.exe"
    },
    "preferredGenerator": {
      "name": "MinGW Makefiles"
    },
    "environmentVariables": {
      "CMT_MINGW_PATH": "C:\\ProgramData\\chocolatey\\lib\\mingw\\tools\\install\\mingw64\\bin"
    }
  },
  {
    "name": "GCC for x86_64-w64-mingw32 8.1.0",
    "compilers": {
      "C": "C:\\ProgramData\\chocolatey\\lib\\mingw\\tools\\install\\mingw64\\bin\\x86_64-w64-mingw32-gcc.exe",
      "CXX": "C:\\ProgramData\\chocolatey\\lib\\mingw\\tools\\install\\mingw64\\bin\\x86_64-w64-mingw32-g++.exe"
    },
    "preferredGenerator": {
      "name": "MinGW Makefiles"
    },
    "environmentVariables": {
      "CMT_MINGW_PATH": "C:\\ProgramData\\chocolatey\\lib\\mingw\\tools\\install\\mingw64\\bin"
    }
  },
  {
    "name": "Visual Studio Build Tools 2019 Release - amd64",
    "visualStudio": "6c93218f",
    "visualStudioArchitecture": "x64",
    "preferredGenerator": {
      "name": "Visual Studio 16 2019",
      "platform": "x64",
      "toolset": "host=x64"
    }
  },
  {
    "name": "Visual Studio Build Tools 2019 Release - amd64_x86",
    "visualStudio": "6c93218f",
    "visualStudioArchitecture": "x64",
    "preferredGenerator": {
      "name": "Visual Studio 16 2019",
      "platform": "win32",
      "toolset": "host=x64"
    }
  },
  {
    "name": "Visual Studio Build Tools 2019 Release - x86",
    "visualStudio": "6c93218f",
    "visualStudioArchitecture": "x86",
    "preferredGenerator": {
      "name": "Visual Studio 16 2019",
      "platform": "win32",
      "toolset": "host=x86"
    }
  },
  {
    "name": "Visual Studio Build Tools 2019 Release - x86_amd64",
    "visualStudio": "6c93218f",
    "visualStudioArchitecture": "x86",
    "preferredGenerator": {
      "name": "Visual Studio 16 2019",
      "platform": "x64",
      "toolset": "host=x86"
    }
  }
]
You can test that it can find all of the needed tools by creating a sample project using the CMake extension’s CMake: Configure command. It makes a hello
world project and you should be able to successfully compile and run it with each build system that you use. Note that you might have to delete your build
folder when switching between systems though. You can find more information on their CMake extension here.
Clang-Format
This was also pretty easy. VScode has a local copy of clang-format, so I don’t need to install all of LLVM. I just need to define a .clang-format file. To help with that, I use the clang-format configurator site to build the file. The format tool searches up through the directory when applying formatting, so I put this at the top level of my account, in the same spot as my Git configuration files. I also store this file with the rest of my configuration files for use on new systems.
Qt Creator
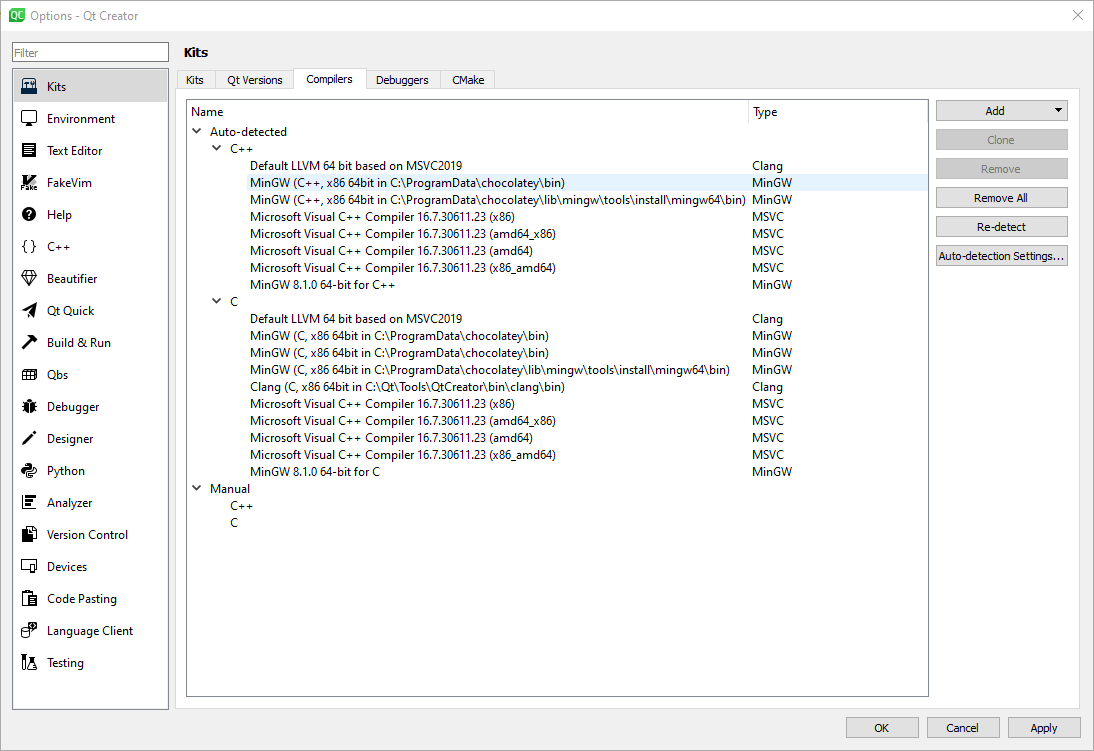
If everything else is done right, this part is actually pretty easy. The download can be found here When installing, make sure to download Qt versions that support the compilers in use. In my case, this is MSVC and MinGW 64bit. You can also uncheck the install of CMake, since it is already on your system. After install, it should recognize all the right build systems since they are on your PATH. Verify this by going in to Tools > Options. There are several tabs to check. Compilers should show your compilers. You might have to click Re-detect to search for them if they aren’t found already. You should see something similar to this.
Make sure it can also find your CMake application, which is on a different tab. If so, then Qt Creator can successfully create projects with any build system that you use.
From there, I went through and set up all the keyboard shortcuts. I basically just viewed all the common ones from VSCode and made it the same for consistency. You can then export the keyboard shortcuts as a file, so I did that for future systems. This is also stored with all my other configuration files. Unfortunately, it isn’t possible to export settings in the same way, so any customization there will need to be duplicated by hand on new machines.
Lastly, I configured code formatting within the IDE. Since there is already an instance of clang-format on the computer, I preferred used that. To do that, make sure the ClangFormat plugin is enabled under Help > About Plugins. Then, go to Tools > Options > Beautifier > Clang Format and set the location of clang-format. Since it is part of VS Code, it is likely found at C:\Users\user\.vscode\extensions\ms-vscode.cpptools-1.0.1\LLVM\bin\clang-format.exe Also make sure to tell the Beautifier to use ClangFormat on the General tab.
As with VS Code, this linter must also find a formatting file to use. If your .clang-format file is at the top level of your space, it will be able to find it without issue.
Lastly, while not essential to functionality, I configure the default project directory to a specific spot on my computer. I also set the default build directory to be a subfolder within a given project. This is to mimic my setup in VS Code.
Once this is done, Qt Creator is configured. You should be able to create a test project and build it with multiple compilers.
Conclusion
That should be everything! You should now have a consistent environment across each computer. While this is still a bit of setup, it is much faster than configuring each computer by hand with less potential for missed steps. Even if you only have a single computer, this is useful as a backup of sorts in case you need to do a reinstall for whatever reason. And in general, the less time you spend setting everything up, the more you can spend developing!